Guide
Introduction
This is a collection of nodes for the popular Node-RED that you can use to save money on variable electricity prices. Node-RED is a widely used low-code programming tool that can be used together with many smart home solutions to create automations.
The solution can be used to control switches or other entities in a smart home system, and for example turn on when the price is low, and turn off when the price is high. There are different ways to calculate what minutes to turn on and off, and these are implemented as strategy nodes. Each strategy node can be configured to fit different purposes.
The strategies need price data to work. These can be received from different sources, for example Tibber, Nord Pool or custom sources.
Price sources
Tibber and Nord Pool are only available in the nordics, so if you live outside the nordics, you must find another source of price data, and make your own input.
Grid tariff is normally not part of the electricity price, so if this varies by time, it must be added before sent to the strategy nodes for calculation. This can be done by putting a ps-xxx-add-tariff node between the price receiver and the strategy.
The strategy nodes have 3 outputs. Output 1 is used to "turn on", output 2 is used to "turn off", and on output 3, the calculated schedule and some other information is sent. You can use this to make graphs, or just send it to a debug node to view it.
Example:
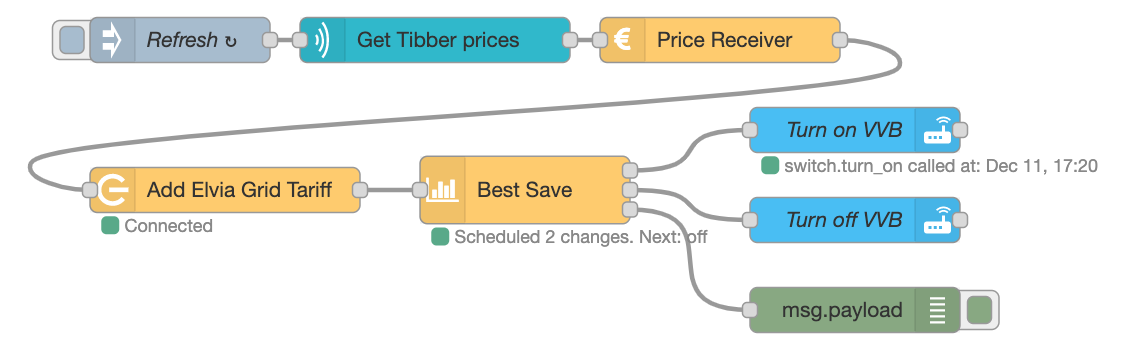
Here prices are received from Tibber, converted in the ps-receive-price node, then grid tariff for Elvia is added before sent to the ps-strategy-best-save node. Output is sent to Home Assistant via two call-service nodes, and the schedule is sent to a debug node.
Home Assistant
The node collection fits very well with Home Assistant (HA), as Node-RED is frequently used for automations, and there also is an integration with Nord Pool, but there is no direct dependency to HA, so all nodes can be used also without HA.
Getting started
Installation
Install in Node-RED via the Manage Palette menu.
May also be installed via npm:
npm install node-red-contrib-power-saver
Make sure that you upgrade now and then to get the latest version. See changelog for changes.
Get price data
This solution is useless without price data. In the nordics, there are at least two very common places to get price data from:
- Tibber
- Nord Pool
The ps-receive-price node is designed to handle price input from both these, and convert it to the format required by the strategy nodes.
If you are a Tibber customer, use the tibber-query node from the Tibber API to receive price, with one of the following queries:
Quarter hourly prices
Please note that the parameter to priceInfo in the queries, (resolution: QUARTER_HOURLY) is new in version 5. It is used to get quarter hourly prices. It will work fine even without this, but then you get hourly prices.
See more details in the documentation for the ps-receive-price node.
Se documentation for node-red-contrib-tibber-api for details about the Tibber query.
Tibber query
You can use an inject node (standard Node-RED) to send the Tibber query as a text string int to the tibber-query node. This can be set to repeat the query for example every hour.
See example of Tibber flow and mqtt
If you use Home Assistant (HA), you can install the Nord Pool custom component, that provides a sensor that gives price per hour for today and tomorrow. Data can be sent from both the current state node or the events: state node.
Quarter hourly prices from Nord Pool
I have not yet examined the Nord Pool API for quarterly hour prices, so this may be outdated.
See example with Nord Pool and current state node
See example with Nord Pool and events: state node
Add grid tariff
When also the grid tariff changes by time, it must be added to the electricity price in order to get the calculations right.
After the the ps-receive-price node, add a ps-xxx-add-tariff node to add grid tariff. What node to choose depends on what grid you get electricity through. The following grids are supported:
| Grid supplier | Node |
|---|---|
| General (any) | ps-general-add-tariff |
| Elvia | ps-elvia-add-tariff |
If your grid is not supported, you may code this yourself.
Skip this step
If the grid tariff is the same the whole day, you can skip this step i the flow.
::: error Not tested for quarter hourly prices Adding grid tariff has not yet been tested or developed for quarter hourly prices. This may not work. :::
Calculate and run schedule
This is the step where the value is produced. Based on the prices received, the optimal schedule for you is calculated automatically, based on your configuration. You can choose between the following strategies:
| Strategy | Node | Description |
|---|---|---|
| Best Save | ps-strategy-best-save | Postpone power consumption when there is most to save. |
| Lowest Price | ps-strategy-lowest-price | Turn on power when the prices are the lowest in a given period. |
| Heat Capacitor | ps-strategy-heat-capacitor | Move consumption from expensive to cheap periods utilizing climate entities. |
These nodes must be configured for your purpose. See configuration description and other details in the documentation for each node.
Send the result from the ps-xxx-add-tariff node (or the ps-receive-price node) as input to the strategy node you choose.
Choose strategy
Choose the best save strategy if you can postpone power consumption, and expect the consumption to occur in the immediate period after power is turned on again.
Choose the lowest price strategy if you need the power to be on for a certain time, but it is not important when that is. Note that you can select to have all time on in one consecutive period, or spread around on the cheapest periods.
Choose the heat capacitor strategy for controlling for example room heating, where you can turn the heat a little down when electricity is expensive, and a little up when it is cheap, using trading principles (only that you know up front when the prices will change).
Use schedule signals
Use the outputs to control switches, thermostats or other entities to control your power consumers.
The following os valid for the Best Save and Lowest Price strategies:
Output 1 is used to turn on. A payload with value true (or another configured value) is sent every time turning on is scheduled.
Output 2 is used to turn off. A payload with value false (or another configured value) is sent every time turning off is scheduled.
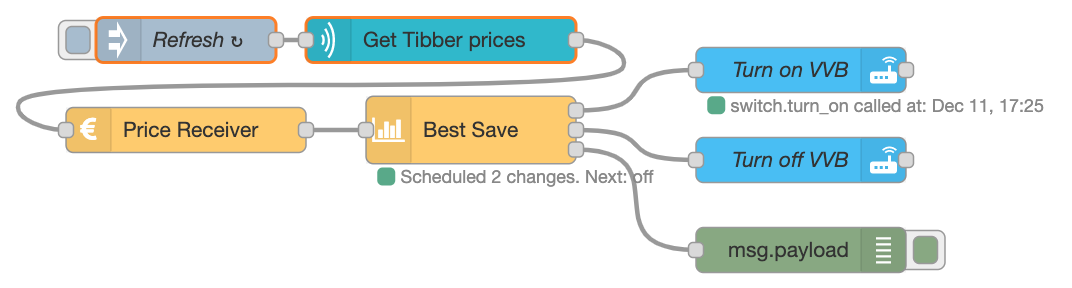
Example using Home Assistant:
Use output
There are many ways you can use the output:
- Turn on/off a switch
- Set a thermostat up, down or to specific values
- Change setting of a dimmer
- Send a notification :::
Display schedule
Output 3 can be used to print or display the calculated schedule. If you just want to see it, send it to a debug node. You can also use it to display the result as graphs in HA.
For users of Magic Mirror and Tibber, the ps-best-save node can send its schedule to the MMM-Tibber module. See more details in the ps-best-save node documentation.
Combine schedules
With the Schedule Merger node, you can combine multiple schedules in order to get more control of the result. You can combine the schedule output from Best Save or Lowest Price nodes using logical ORor AND algorithms. Here is an example:
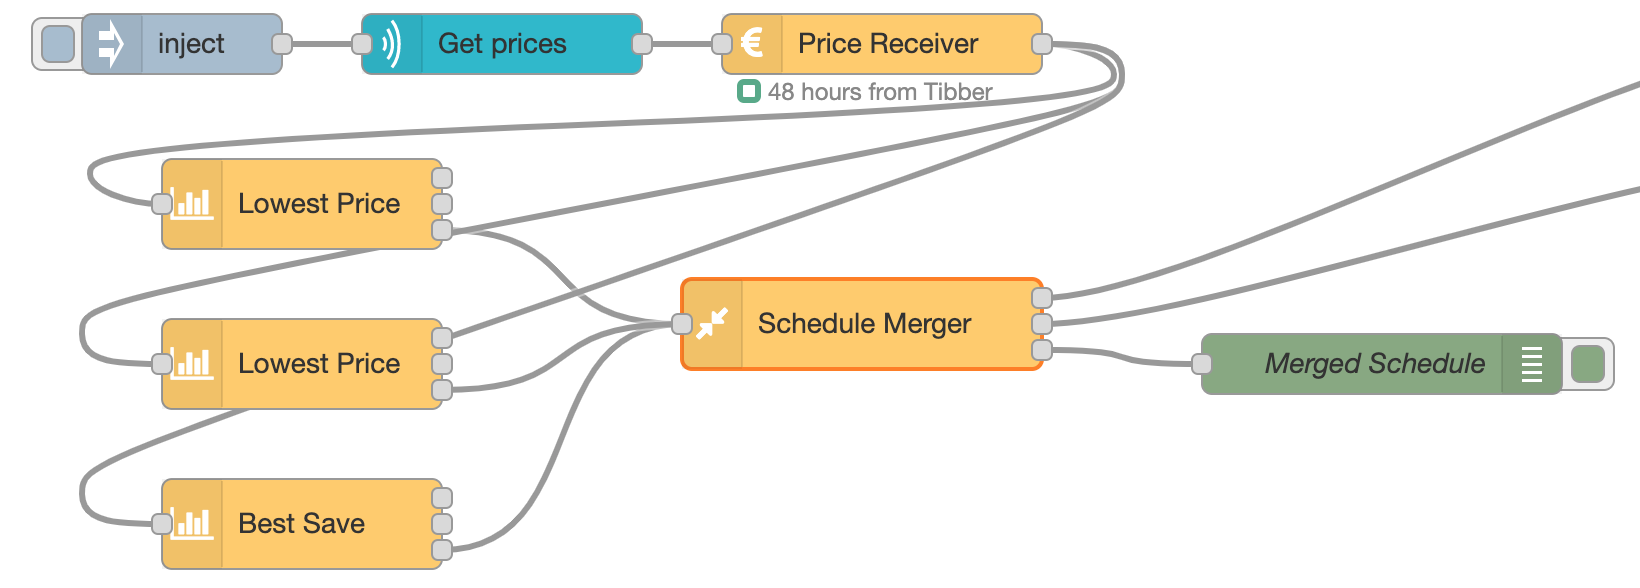
In this example, the result of two Lowest Price nodes and one Best Save node are combined in a Schedule Merger node, resulting in one schedule. The output from the Schedule Merger node is used to control a switch.
Se the Schedule Merger node for more details.
More information
There are more details and more information in the documentation for each node and in the examples.
Migration from v4 to v5
Version 5 has been developed to support quarter hourly prices. Actually it will just as well suport price per minute, but that is not relevant. However, the schedules can now be set with minute resolution instead of hourly resolution as before.
Breaking change
Upgrading to version 5 is a breaking change. The configuration of the Best Save and Lowest Price nodes are changed, so you must set them up more or less from scratch.
Many features have not been properly tested, so be prepared that things may not work as expected. Please report any such findings.
Note down values before you upgrade
You should open all your Best Save and Lowest Price nodes and note the settings so you can convert them to corresponding settings in v5.
Upgrade Best Save
Max per sequence has been replaced with Max minutes off. You can multiply the old value with 60 to get the corresponding new value.
In v5 there is also a Min minutes off that you can use to make sure it turns off a minimum period.
Min recover has been replaced with Recovery time % and Max recovery time. There is no way to directly translate from the old value to the new. Primarily use the % to say that after a period of x minutes off, it must be on this many % of x after turned on again. You can set a maximum revovery time to limit the required time on after being off. You can set this value to the old Min recover value multiplied by 60, and set the Recovery time % to 100 to get the closest you can to the old setting. However, the new setting is more powerful, so it is better to use it as it is supposed to be used.
The other settings are as before.
Upgrading Lowest Price
From time has been replaced with From hour and From minute. This gives you the flexibility to control the period more detailed than before. If you set From hour to the same value as From time was, and keep From minute to 0, the result will be as before.
The same way, To time has been replaced with To hour and To minute.
Hours on has been replaced with Minutes on. Multiply the old value with 60 to get the same setting.
The other settings are as before.
Disclaimer
This software is offered for free as open source. You use it totally on your own risk. The developers take no responsibility of any consequences caused by use or misuse of this software.
It is not recommended to reduce the temperature of the water heater or similar over longer periods, due to the risk of legionella. Please read the recommendations of FHI about this. You do this at your own risk.